If you want an easy life, let your usability testing agency host the usability sessions at their labs. They’ll organise everything, so you just need to turn up when you want, munch on some biscuits, and drink too much coffee. But, if you want to look awesome in front of your colleagues and more importantly, your bosses, then you’ll want to host the sessions in-house.
The downside is that you need to work quite hard in order to make these usability sessions a success. Fret not, that’s why you’re reading this! We can’t do it all for you, but we can give you some ideas on how to get the most out of these sessions, and a comprehensive ‘to do’ list to make sure everything goes smoothly.
Before booking the sessions
1. Speak to Facilities Management
Make sure that you can secure two rooms. The testing room and the observation room.
The testing room needs to be a small meeting room which will host the usability testing sessions. All you need in this room is room for a laptop or computer, two people, and an area for some refreshments.
The observation room will be a larger meeting room typically used for presentations. In this room, you need enough space for people to sit comfortably, ideally around a table with refreshments, with a large screen displaying the video feed from the testing room. Ideally, this will be a large TV with quality in-built speakers, or excellent external speakers.
We would strongly recommend making sure that these rooms are not next to each other and have sufficient sound proofing. The last thing you want is for your participant to be able to hear one of your team members shouting “Just click on the button!” from the room next door.
2. Speak to IT
Make sure that they will allow two computers to connect to each other on the network. Most likely, these will be laptops provided by your usability testing supplier, so you may need to work out what software they will be running, what operating system, and any other technical requirements.
If this is not possible, you may still be able to host the sessions using one laptop connected to the network which broadcasts the screen and microphone using an online meeting tool such as WebEx or GoToMeeting. The second laptop in the observation room will then simply connect to the meeting.
2 weeks before the test
3. Run a pilot test
Book both rooms you plan to use for a pilot test. Invite the people running the test to come in and set up the equipment exactly as they will on the day of testing. Ideally you should get someone from IT on hand in case you run into any problems. Make sure your mock usability test can be seen and heard clearly in the observation room. This is an essential part of the process as it allows you to discover any problems early enough to be able to resolve them.
4. Book the rooms for the test
The most important thing to do is to give yourself plenty of time to book the rooms you need, and protect them carefully. Once you’ve agreed the dates of the testing with your agency, and they are confident that they can recruit people on those days, then you’re ready to secure the rooms. At this point, you should also book refreshments to arrive throughout the day in both rooms. Obviously the observation room will require more refreshments at more regular intervals.
5. Set up an attendance schedule
Once you know your room size, the slots for the tests, and the dates for the tests, you can set up a schedule to track who is attending when. If you want maximum exposure, then this is critical to making sure things run smoothly and the observation room doesn’t become an overcrowded, sweaty experience for the people you are trying to impress.

One way to do it is to list out the teams you want to invite to attend, place them in order of priority, then assign a number of slots for each team. Whatever you choose to do, make sure you have enough seats for everyone, and make sure that you have a few empties to allow people who can’t commit to a time slot to drop in.
6. Invite people to come and observe
To get the best turnout, make it clear to everyone what the sessions are for, what they can expect, and how long the sessions will last. You’ll need to work on an elevator pitch for the senior execs to try and get as much exposure as you can. This is especially important if you have not done much usability testing before in the company, and if you are looking to gain more momentum for doing them more regularly.If you’re planning on inviting important stakeholders and execs, make sure you get them to come along after the first couple of sessions. Typically, this is where any glitches appear, and will allow you to settle into the observation-hosting role.
A couple of days before
7. Inform reception & security
Once you have the names of the participants attending the sessions, make sure you book parking spaces, organise any security for them (and the testing facilitators), and inform reception of who to expect and when. At this point, you should be clear with the test facilitator about who does what task when participants arrive. You need to make sure there is a comfortable waiting area for them if they arrive early while another session is going on. You also need to be clear about who they should ask for when they arrive at reception, and who will meet and greet and bring them to the testing room.
8. Create and print observation materials
At this point, you should print out some basic details about each participant (but don’t include their name or personal contact information). It is useful for people to understand who the person is and why they were recruited. It is also useful to create a one-pager for observers to understand the purpose of the test, what is in and out of scope, and a little background on the project. This is particularly useful for the senior executives attending. Having this prepared in advance will make you look highly professional.
Printing out screenshots of the core user’s journey can be a useful way to track issues.
On the day of testing
9. Place notices on the doors of each room
Print “Do Not Disturb’ signs for the test room door to try and avoid any interruptions. It also can be useful to print the schedule for the observation room to allow people to see what time the sessions are and who is attending which session.
10. Host and manage observers
You should set up the environment to allow for people to just sit comfortably and watch. There will always be some debate and discussion, which is natural, but this can sometimes get in the way of actually watching and seeing further interesting insights. The best way to run these sessions is to capture the issues on Post-it notes and place them on the wall next to the screenshots of each core page.
If you’re comfortable with managing observers, you can then use the time between sessions to capture further thoughts from the observers and add additional insights to the wall.
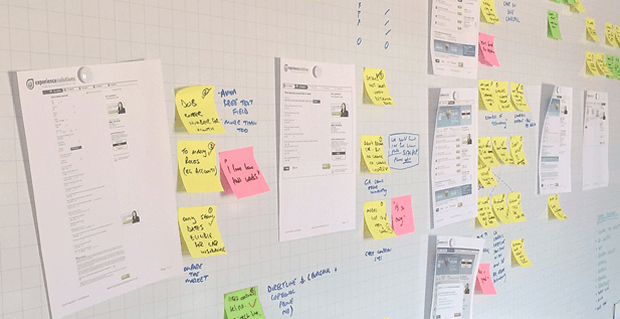
As people drop in for later sessions, you can show them the wall and encourage observers to write new Post-its that you can gather up and organise at the end. Done well, this can be a great way to capture your findings. We often use three different coloured stickies for usability issues, user preferences, and positives.
11. Make a note of who wants the final report
It can be useful to maintain a list of who would like to receive the final report or attend any follow-up meetings from the usability tests. If you are inviting people outside of the immediate project, it can be useful to keep them involved in any follow-ups. This is particularly useful in getting your project noticed and not forgotten about.
12. Have a clip ready in case of no-shows
One of the drawbacks for hosting any usability testing is the possibility of participants failing to turn up. It happens from time to time. If you’ve got a lot of people observing, it can be a waste of everyone’s time. The best way to maximise their time, and again make you look super organised, is to have a previous session ready to play back instead. Ask your usability test facilitators if they can provide the full video immediately after the first session to make sure you’re always prepared.
Following these tips should mean that your testing sessions run smoothly and you’ll be recognised for all your hard work. There is a lot of preparation behind the scenes for usability testing and spending the time and effort on them can make the difference to your project. If you can think of anything we’ve missed, or if you have any questions, send us an email and we’ll be happy to help. Good luck!